Baby Blanket Number 5 is finally on the loom! I admit that I was getting nervous. My niece’s baby is due in late November and here we are in late September already. I had come up with the design. My grand-niece is to be named for my grandmother. My grandmother was a prolific quilter whose favorite pattern was Grandmother’s Flower Garden, a design based on hexagons. I do quilt, but I wanted to make my grand-niece a woven baby blanket (my specialty) that evoked my grandmother’s favorite quilt pattern. This isn’t the first time I’ve come up with a design that I can’t weave because I don’t have the loom, but it’s never a comfortable situation.
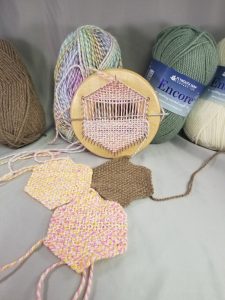
Normally I weave my pin loom baby blankets on a square pin loom. I knew there was a hexagonal pin loom available, which should have been perfect for the job. However, I never cared much for the generation 1 version of the Turtle Loom. Instead of pins, nails were used, which I found rather klunky. It’s not easy to slide the finished piece off a loom over nail heads. Two of the nail heads were painted white to indicate the top and bottom of the loom. I questioned the permanence of the paint.
Generation 2 of the Turtle Looms were due out about the time I completed Baby Blanket Number 4, reviewed earlier. Nails had been replaced by pins and the painted nail heads replaced by marks in the wood frame. This seemed like it would resolve all my issues. I was hoping to take the Baby Blanket Number 5 project along with me on my recent trip to Colorado. Unfortunately, there were delays in manufacturing so starting the blanket was delayed. Yesterday, as I came in to teach my monthly beginning rigid heddle weaving class, the shop owner told me that the generation 2 Turtle Looms were finally in! I grabbed one and the yarn I needed and got started.
So this blog post will also be a review of the Generation 2 Turtle Looms; the Good, the Bad and the Ugly.
Unboxing
Well, it’s really unbagging. The Turtle Loom comes in an organza bag. Here’s what’s included:
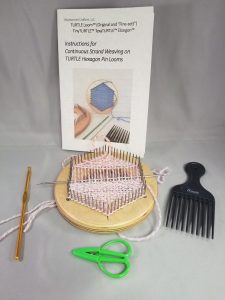
- The Turtle Loom – the pin loom comes in several sizes. I bought the Original which produces 4″ hexagons from worsted weight yarn. This makes it comparable to Schacht’s Zoom Loom which produces 4″ squares with the same worsted weight yarn.
- Weaving Needle – Like the Schacht Zoom Loom, the Turtle Loom needs the enclosed weaving needle to weave the center part of the piece.
- Crochet hook – unlike the square pin looms which only need a weaving needle, the Turtle Loom requires a crochet hook, which is included. The Regular comes with a 4mm crochet hook
- Hair Pick / Weaving Fork – although the “weaving fork” isn’t necessary to pack the weaving, it’s a nice-to-have. And you can use it on your unruly hair if you need to.
- Instruction Booklet – the instruction booklet has clear instructions with photographs for making the hexagons.
What You’ll Need
In addition to the Turtle Loom and the yarn, you’ll need a pair of scissors. I try to keep a small pair with every project as as chasing scissors is one of my least favorite activities.
The Good
The Turtle Loom is easy to use. Experience with the Schacht Zoom Loom isn’t necessary. It helps in some ways and actually hinders in others. Because the the loom isn’t warped as the square pin looms are, there is some unlearning that needs to take place. Once you realize that they are two different looms, it’s easy to use the Turtle Loom
The enclosed instruction booklet provides clear, well illustrated instructions. It took me almost no time to get the hang of using the Turtle Loom
The pins that mark where the weaving changes from triangular weave to rectangular weave area clearly marked in the wood frame.
The pins that mark the top and bottom of the loom are clearly marked in the wood frame.
It’s easy to slide the work off the Turtle Loom now that pins are used instead of nails.
The Bad
The enclosed instruction booklet contains no instructions for joining the hexagons. The book refers to weaver to YouTube videos. That’s all well and good but there are people who don’t like YouTube and it’s frustrating to be working on a project and need to go elsewhere for vital information. Schacht, on the other hand, includes instructions for joining the squares in the Zoom Loom’s instruction booklet.
The Ugly
While the Generation 2 Turtle Loom looks more professional with its pins instead of nails, there are still some areas that could be improved.
The top and bottom pin markings in the wood look like the wood was split and dye poured in. I think the marks were actually made with a wood-burning tool, but it really looks like accidental wood splits. This is picky of me, I know, but I feel that more professional-looking marks could have been done.
To start the weaving, it’s necessary to tie a slip knot in the yarn and put the slip knot over the top pin. The yarn tail, which will be used for sewing the hexagons together, gets in the way when the weaving is begun. I’d like to see a notch such as Schacht uses on the Zoom Loom to hold the beginning tail of yarn. It keeps the yarn tail from interfering with the weaving.
The pins are uneven. I don’t mean the difference in spacing between the top/bottom pins and the side pins, although I question whether they’re right, I mean that what should be pins on a straight plane are actually slightly uneven and the pins themselves are not driven into the wood straight. These defects don’t seem to affect the weaving, but they contribute to the loom looking unprofessional.
Conclusion
Overall, I like the Turtle Loom. It’s easy to use and produces a different kind of woven shape. I’m looking forward to this “Grandmother’s Flower Garden” woven baby blanket. I hope my great-niece will like it!
 When I set up the Katie, I almost replaced the apron ties before putting my first warp on. I did not believe the tapestry warp thread would be strong enough. I decided to set up the loom according to the manufacturer’s instructions anyway. This was a big mistake as two of the front apron ties broke when I was about a foot into the weaving. I decided that it could be fixed and I wouldn’t have to cut off the project, but it was disconcerting, to say the least. I am an experienced weaver and have woven on multiple looms, old and new. I have an experienced loom repairman on call as well. In other words, I have resources available that most weavers, especially beginning ones, do not. I still found the breaking apron ties unsettling.
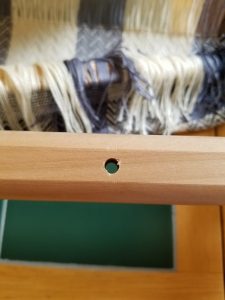 When finishing the loom (more about that below) be sure to sand the holes in the warp and cloth beams. Mine were completely unfinished and had both sharp edges and material in the holes. Please see the photo at right. Even if the warp thread hadn’t been too light, it would have been abraded by the sharp edges of the holes and broken anyway. As you sand the holes, try to angle the edges of the holes a bit. There is a way of doing so with a drill and a chamfer bit, but be aware that doing so WILL INVALIDATE THE MANUFACTURER’S WARRANTY! I wouldn’t recommend beveling the holes with a drill and chamfer bit except to experienced woodworkers. I had it done to mine and I love it.
 I was able to replace the outside cords with Texsolv with the piece still attached to the apron rod. However, I couldn’t get the middle Texsolv tie on. I used stout cotton cording for that. I think it will work just fine on this one project. As soon as the project comes off, I’ll replace it with Texsolv.
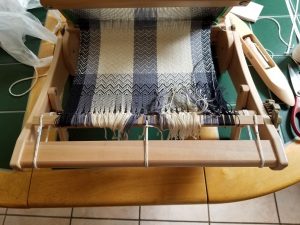
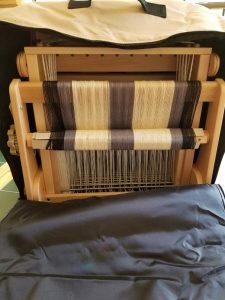 As I said before, the main beauty of the Katie is its portability. It’s an easy loom to fold up with the weaving in place and fits nicely into its carrying case. Here are the steps I discovered for packing up the loom.