Here I am with the first of an ongoing series of equipment reviews. If you’re into sport technology / wearable technology, you’ve probably heard of DC Rainmaker. His product reviews are invaluable. Although I don’t claim to be anywhere near his level, I thought it would be a good idea to do something similar for the weaving equipment world. Weaving equipment is expensive. There’s no getting around that. It can also take up a considerable amount of space. The purchase of a new loom is rarely an impulse purchase. Looms are also specialized for certain types of weaving. I’ll never forget the panic one day of welcoming my students to a tapestry weaving class only to discover that one of my students had been told (I’ll never know by whom) that a tapestry loom capable of using four sets of string heddles was the same as a 4-shaft floor loom.
So today, I’m starting with a review of the Ashford Katie table loom. The Katie has been out for some years so it’s not a new loom. I purchased mine new on Wednesday, July 24, 2019 through my local yarn shop. It arrived on Saturday, July 28.
Ashford Katie Fast Facts
- Maker: Ashford Wheels and Looms (New Zealand)
- Dimensions (folded): 18.25″ wide, 10.5″ deep, 18.75″ high / 46.5 cm wide, 28cm deep, 47cm high
- Dimensions (unfolded): 18.25″ wide, 29″ deep, 18.5″ high / 46.5 cm wide, 73cm deep, 46cm high
- Weight: 14.25 pounds / 6.5kg
- Price as of July 2019: $1,105.00 USD
- Shafts: 8
- Treadles: none
- Weaving width: 12″ / 30cm
Unboxing
So let’s start with an unboxing. Unfortunately, I didn’t get photos as I was unboxing it. (I have lots to learn about this review process!) Here’s a list of what’s in the box:
- The Katie 8-shaft table loom – mostly finished and assembled
- 320 Texsolv heddles installed, but not separated (40 per shaft)
- Carrying bag
- In a separate sealed pouch
- Top beater rail
- 10-dent reed
- Hardware to mount top beater rail
- 5 apron rods / lease sticks
- 6 pieces of tapestry warp thread to use as apron ties to attach the apron rods to the loom
- 2 pieces of bungee cord to return the beater to neutral
- sleying / threading hook
- cardboard packing sticks
- 2 unfinished stick shuttles
- In a separate sealed pouch
- Instruction sheet
- Table Loom instruction booklet
- Ashford product booklet
- The Wheel newsletter
Following is a list of supplies that I think you should order or have on hand when you order the Katie. This is not meant to be a list of weaving supplies you will need, such as boat shuttles and a warping board. This is a list of supplies I think you’ll need to set up the Katie itself.
- 3 yards / meters of Texsolv cord
- 220 or 400 grit sandpaper
- Ashford spinning wheel wax or similar wax such as Howard’s Feed and Wax
- scissors and matches or a soldering iron or hot knife to cut and seal the Texsolv.
Now that we have the facts and unboxing out of the way, let’s discuss the loom. I’m dividing this into The Good, The Bad and The Ugly.
The Good
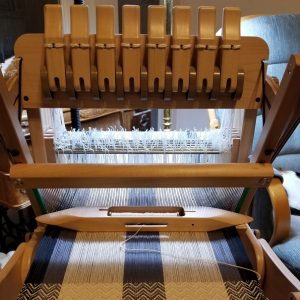
Overall, the Katie is a great little loom. However, it is meant for small projects. It has only a 12″ weaving width, which results in fabric that is roughly 10.75″ finished width. I wouldn’t call it extremely lightly built, but it’s not the loom to weave rugs on. It shines as a sampling loom and a workshop / travel loom. Weighing in at only 14 pounds / 6.5kg and fitting in its own bag, it’s a beauty to take on a road trip or to a guild meeting or workshop.
I am not a fan of table looms. I’ll state my prejudice right here. Mostly, I don’t like them because of how far I have to reach to raise and lower the shafts. It winds up being more of an upper body workout than I like. The Katie has won me over. One of the easiest things about weaving on it is how easy it is to flip the levers to manipulate the shafts. Using levers to manipulate the shafts (or a direct tie-up floor loom) is slower than a loom with lams and treadles. This is a cost of using a table loom. A huge advantage, and one that I stress to my students, is that you gain an understanding of the warp thread movement that produces the cloth.
I find the Katie easy to warp. It works well either front-to-back or back-to-front. I did have a little difficulty getting an even tension on my first project I think this may have been because of another issue I faced later on.
One of the things I like best about the Katie is the overhead beater. One of the weaknesses of table looms is the swing of the beater. Because the beater is so short, it has a steep arc. There is very little weaving area before the beater arcs so badly that it’s pushing down on the fabric rather than packing the weft. Ashford addresses this problem in the Katie and its other table looms by using an overhead beater. The height of the beater can be greater, allowing for a shallower arc to the swing. You still have to advance early and often with the Katie, but it’s much more reasonable.
The Bad
The Katie’s weakest point, as it comes from the manufacturer, is the use of tapestry warp thread as apron ties. I truly went past the lengths of thread in the accessories bag looking for the apron ties. When I realized that the tapestry warp thread pieces WERE the apron ties, I was shocked. Ashford uses much stronger nylon apron ties on all its rigid heddle looms from the least expensive to the most expensive. Rigid heddle looms typically don’t put as much tension on a warp as multishaft looms.
Although the diagram of how to set up the apron ties is clear, there is considerable difficulty in tying the apron rods to the loom and getting the ties a consistent length. You’ll either need a willing helper, three hands or use my alternate solution presented below.
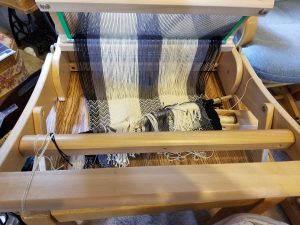 When I set up the Katie, I almost replaced the apron ties before putting my first warp on. I did not believe the tapestry warp thread would be strong enough. I decided to set up the loom according to the manufacturer’s instructions anyway. This was a big mistake as two of the front apron ties broke when I was about a foot into the weaving. I decided that it could be fixed and I wouldn’t have to cut off the project, but it was disconcerting, to say the least. I am an experienced weaver and have woven on multiple looms, old and new. I have an experienced loom repairman on call as well. In other words, I have resources available that most weavers, especially beginning ones, do not. I still found the breaking apron ties unsettling.
This is a modification I would recommend to most weavers during the setup phase. Leave the tapestry warp thread pieces in the bag. Cut and seal 6 pieces of Texsolv. Each piece needs to be 16.5″ or 42cm. Count to be sure that each piece has 35 “buttonholes.” It is very important that each piece of Texsolv be exactly the same length.
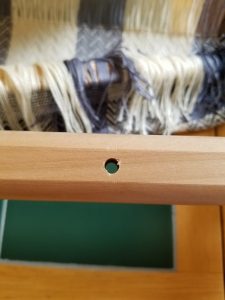 When finishing the loom (more about that below) be sure to sand the holes in the warp and cloth beams. Mine were completely unfinished and had both sharp edges and material in the holes. Please see the photo at right. Even if the warp thread hadn’t been too light, it would have been abraded by the sharp edges of the holes and broken anyway. As you sand the holes, try to angle the edges of the holes a bit. There is a way of doing so with a drill and a chamfer bit, but be aware that doing so WILL INVALIDATE THE MANUFACTURER’S WARRANTY! I wouldn’t recommend beveling the holes with a drill and chamfer bit except to experienced woodworkers. I had it done to mine and I love it.

Once the warp and cloth beam holes are tidied up, thread a piece of Texsolv cord into each hole. Bring the end around the beam to the top and thread the opposite end of the cord through the second buttonhole from the end. Make a sharp crease about midway down the cord and thread the crease through the second buttonhole from the opposite end. Once all three cords are in place slip the apron rod into the three loops and pull the apron rod tight to cinch up the cord. The combination of stouter cord and the smoother wood will keep your apron ties happy for a long time. The other advantage is that the cords are all exactly the same length so you avoid the apron tie alignment issue I spoke of earlier.
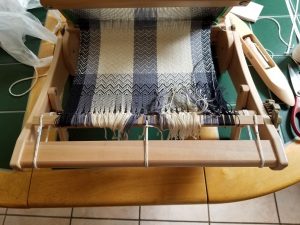 I was able to replace the outside cords with Texsolv with the piece still attached to the apron rod. However, I couldn’t get the middle Texsolv tie on. I used stout cotton cording for that. I think it will work just fine on this one project. As soon as the project comes off, I’ll replace it with Texsolv.
I must say that I’m disappointed in Ashford for taking such shortcuts, especially with a high-end loom. $1000+ USD is quite a bit to pay for a loom. I would expect it to be 100% well made, not 95% and the remaining 5% so critical. I hope my tips help a new Katie owner to avoid having the apron ties break and the resulting anxiety.
The Ugly
As mentioned above, the Katie has an overhead beater. It is held in place with two side pieces of plywood. The plywood is not sanded smooth nor finished. I would recommend sanding the pieces as best you can with them mounted on the loom. After getting them nice and smooth, apply a coat of Ashford’s spinning wheel wax or Howard’s Feed and Wax. It not only makes them smooth and pretty, it smells good, too! If the roughness of the plywood doesn’t bother you, leave it alone. It makes no structural difference to the loom. I am picky about my tools so I want them as well finished as possible. I would also carefully sand and wax the end grain of the cloth and warp beams opposite the brakes. Again, it isn’t a structural issue, but it does make them much nicer.
Packing Her Up!
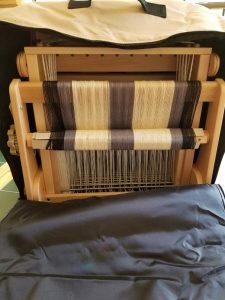 As I said before, the main beauty of the Katie is its portability. It’s an easy loom to fold up with the weaving in place and fits nicely into its carrying case. Here are the steps I discovered for packing up the loom.
- Loosen the cloth and warp beam brakes.
- Remove the beater bungee cords from the slots/holes in the castle.
- Raise the overhead beater supports to bring the beater against the castle.
- Loosen the cloth beam and unlatch the V-shaped locks
- Fold the front part of the loom against the castle and tighten the lock knobs.
- Repeat the above two steps for the warp beam.
- Put the loom into the bag with the cloth beam (front of the loom) facing the back of the bag. It’s tempting to put the loom in the bag with the front of the loom facing the zipper closure. If you do, the zippers will be strained over the brake knobs. Putting the loom in the bag with the cloth beam facing the back of the bag alleviates that issue.
Zip her up and you’re ready to go!!
laurie jane kern says:
Thanks for the info on replacing the apron strings. I just got a used Katie and could not believe how thin and SHORT the apron ties were, they wouldn’t even come above the beam!
Carolyn Deverin says:
I’m just unboxing my new Katie and your advice has been very timely and appreciated!!! Many thanks. Is their a website for weavers using the Little Katie?
daledoll says:
I’m glad you found the review useful. I can’t think of any online groups specifically for the Katie. There are weaving groups on Facebook as well as the more popular fiber arts social media sites. I don’t know if you already belong to any, but if you do, check there and you’ll find groups dedicated to weaving and probably even some dedicated to table looms.
Weave on!
Carolyn says:
Thanks
Jenni says:
I’ve been thinking of adding a table loom to my collection and am tempted by the Katie because of the portability. Thank you for you great review. I hope you do lots more.
daledoll says:
Thank you!
I think the Katie is a great addition as long as you remember that it’s only 12″ (30.5cm) weaving width in the reed. If that works for you, then I think you’ll probably be happy with it.
Ally says:
Thanks so much for your review and tips! I just got a Katie (a new little sister for my floor loom 😊) and am taking your advice to replace the apron strings with Texsolv.
I see what you mean about the plywood parts for the beater. Mine appears to be finished but I definitely feel some rough spots. And my holes on the warp and cloth beams are also a little rough. But I’m going to leave those as is and come back to it at a later date if it ends up bothering me.
Thanks again, and happy weaving!
daledoll says:
I’m glad it helped! I love my Katie, with the modifications. Check after your first project or two to be sure the roughness of the cloth and warp beam holes isn’t abrading the apron ties. TexSolv is tough stuff, but it can be abraded. If it seems to be okay, then the holes are probably just fine.
Weave on!
Debbi